

How to Change a Flat Tire
- Vehicle Maintenance
- PEAK
- August 27, 2024
Follow this detailed guide on how to change a flat tire. Everything you need to know in one convenient place!
You're out in the middle of nowhere, so far afield that you don't even have phone service. You hit a weird bump and a few minutes later, your car starts to feel like it's driving through a swamp. A dashboard light flicks on, confirming your fear: you've got a flat — and even worse, you don't know how to change a tire.
It's a scenario every motorist dreads, but it's one you can avoid by learning how to change a flat tire — before you get one. Though you'll need a little elbow grease, the task itself is pretty straightforward. This step-by-step guide explains everything you need to know.
Things You'll Need
The key to a successful tire replacement is to prepare in advance. Whether you're driving near or far, always make sure you have the following items in your vehicle:
- An inflated spare tire
- A car jack and lug wrench
- Your vehicle's owner's manual
Your car should be equipped with the items above. You'll need to supplement them with:
- A rain slicker and work gloves
- Tire pressure gauge
- Flashlight and spare batteries
- Two wheel wedges (bricks or large, heavy stones will also work in a pinch)
- A length of wood (about 2" x 6") to help secure your jack
Start by doing a little background reading: see what your owner's manual says about how to change a tire. It might contain important vehicle-specific information that could make the task easier.
How to Change a Tire: 14 Steps to Success
As soon as you realize you have a flat, get off the road as quickly as possible. Stop in a parking lot or rest area if one is available. Failing that, pull onto the road shoulder if it's wide enough.
Next, activate your hazard lights and engage your parking brake. Your hazard lights warn other motorists that your car is immobilized, and your parking brake will prevent it from rolling while you complete the tire change.
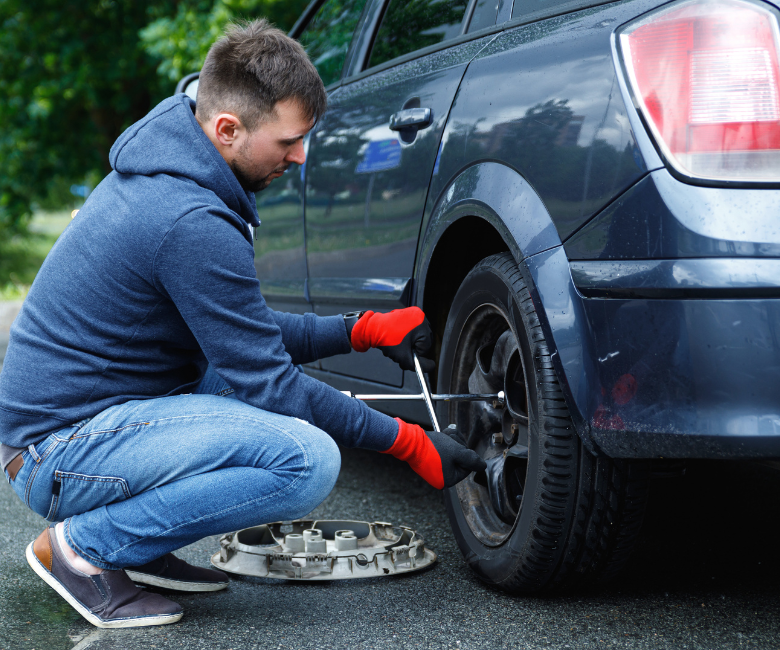
With those basics covered, put on your gloves. It's time to get to work. Here's how to change a tire, step by step:
Place your wheel wedges
Both wheel wedges should go under the tires at the vehicle's opposite end. If one of your front tires is flat, your wheel wedges should go under the rear tires and vice-versa.
Your wheel wedges create extra security, ensuring your car won't roll away while you work.
Remove your hub cap (if you need to)
On some cars, the hub cap covers the lug nuts that hold your tires in place. To remove it, use the flat end of your lug wrench as a prying bar.
Slip the flat side of the wrench between the hub cap and your tire. Pry the hub cap loose until it pops off. It shouldn't be too difficult, even if you aren't known for your arm strength.
On other cars, the lug nuts are accessible without removing the hub cap. If this is the case, you can leave the hub cap in place.
Loosen your lug nuts (but not all the way)
Secure your lug wrench on each of the lug nuts holding your flat tire in place. Turn counterclockwise until each nut comes loose.
Fair warning: this can take some time and effort. You might need to use your feet and leverage your body weight to overcome resistance.
At this stage, you don't want to remove your lug nuts entirely — that comes later. Instead, loosen them about a quarter-turn or a half-turn but leave them in place.
Elevate your vehicle
It's time to raise your car so you can remove the flat tire. First, select the right position for your jack. Your owner's manual will tell you exactly where it should go.
If your owner's manual isn't available, check to see if you have a special metal groove and a plastic molding built into the bottom edges of your car frame. If so, that's where to position your jack. Otherwise, select a jacking point along the vehicle frame that's close to the tire you're changing.
Next, place your 2" x 6" length of wood under your car jack. This is particularly important if you're on an asphalt surface, as the wood will help prevent the jack from slipping as it bears the weight of your elevated vehicle.
When everything's ready, jack up your vehicle until it's about 6 inches off the ground.
Remove the lug nuts
Now, go back to your lug nuts and remove them entirely. You can probably do this by hand once they've been loosened, but if not, use your lug wrench.
Pull your flat tire off
Grip your flat tire by its treads, with your hands positioned at 3 o'clock and 9 o'clock. Pull firmly but gently to remove the tire from the hub and place it flat on the ground so it can't roll away.
Place your spare tire
Align your spare tire's rim with the lug bolts and push it into place. If you've positioned it correctly, the lug bolts should be visible through the spare tire's rim.
Tighten your lug nuts (but not all the way)
Put the lug nuts back on the exposed bolts and turn them clockwise by hand to tighten them, but leave some slack. You'll use the lug wrench to finish tightening them momentarily.
Lower your vehicle (but not all the way)
With your jack, lower your vehicle slowly so the spare tire touches the ground but isn't bearing any weight.
Tighten your lug nuts all the way
With your lug wrench, turn clockwise to fasten your lug nuts into place as tightly as you can. Use all your strength, like you did when you loosened them.
Lower your vehicle all the way
Use your jack to lower your vehicle all the way to the ground. Remove the jack and your short length of securing wood. For good measure, see if you can tighten the lug nuts a tiny bit more.
Replace the hub cap if you can
If you removed your hub cap, check to see if it fits your spare tire. If it does, put it in position on your wheel and press in on opposite sides as hard as you can. It should pop into place.
If it doesn't, don't worry about it — you should be fine without it until you can get a proper new tire installed.
Check the pressure level in your spare tire
Use your pressure gauge to double-check your spare tire. Our Ultimate Road Trip Checklist has specific instructions if you don't already know how to do this.
Most spare tires are known as "T-type" spares. These should be inflated to about 60 pounds per square inch (psi), or around 420 kilopascals (kPa).
If your spare tire's pressure is below this threshold, you'll need to drive with extra caution.
Drive slowly to a service station
Once you've put all your tools and equipment in your trunk, you're ready to hit the road. Drive straight to the nearest service station so you can seek professional help completing your tire replacement.
Tips for driving on a spare tire
Do not exceed 50 mph (80 km/h) on your spare tire, and drive no more than about 70 miles (110 kilometers) on it. If your spare tire is underinflated, cap your speed at about 35–40 mph (55–65 km/h) to be on the safe side.
If you like, you can keep your hazard lights on as you drive. This way, other motorists know you're moving slower than regular traffic.
When driving at slower-than-usual speeds on a multi-lane road or highway, keep right.
Important Safety Information
As you learn how to change a tire, safety is critical. You're more vulnerable when you're stranded, and you may need to complete the tire replacement on the shoulder of a road with live traffic.
Protect yourself by following these safety tips:
- Perform your tire replacement on level ground whenever possible.
- If you're working on the roadside, choose a straight stretch if you can. This will make you more visible to other drivers.
- Never work on a narrow shoulder. If you can't immediately find a suitable place to stop, engage your hazard lights and drive very slowly on your flat tire until you reach a safer place.
- Do not put any part of your body below the vehicle as you raise it with the jack, or while your vehicle is elevated. Otherwise, you risk a very serious injury.
If another motorist stops to help, you can accept their offer if it feels safe to do so. However, you should never leave the scene with a person who is not known to you.
Maintain PEAK Performance with Quality Automotive Products and Accessories
Now that you've learned how to change a tire, you can check out our DIY Hub and our PEAK News portal for more helpful car care tips and how-tos for drivers of all skill levels.
Remember: car care is an ongoing process and we've got you covered with maintenance checklists and a complete lineup of automotive lighting products, diesel exhaust fluids, high-performance antifreeze and coolants, and premium wiper blades and windshield wash formulations for maximum visibility.